Showing posts with label #pinaddicts. Show all posts

Tuesday, 12 February 2013

Pinaddicts and Crochet Monsters

About 5 months ago, I was getting organised for my eldest's birthday party and had an idea to make crochet monsters instead of party bags (a pet hate but that's another blog post). I was inspired by these creations from craftiscool.

Amigurumi monsters by CraftIsCool


Wind forward to 2 days before the party and I realised that I had something close to 20 guests coming and only 5 monsters made. It was not going to happen.

I improvised and made ghost lollies instead. 20 happy party guests.

Wind forward a bit more and I find myself preparing for my daughters birthday party. Now where did I put those crochet monsters?

Twelves party guests, one week to go and 5 already made. The maths seemed to work so I got crocheting, sewing and embellishing with buttons. I would have taken photos as I went, but I was kind of in a rush *mops brow* so forgive me.

Essentially, the body is made up like this:

Chain 14
SC into 2nd ch from hook
work sc into each chain stitch back to your 1st stitch.
3 SC into 1st chain stitch
Turn and sc into each stitch of the original chain for 12 stitches.
3 SC into the 13th stitch and then SC into each stitch.
Continue to SC for 15 rounds.
Slipstitch last stitch to finish.

I added hair by chain stitching long loops of about 15 chains per loop and then slipstitching into the top to make a loop.

I added felt mouths or eyes, stitched on buttons and added some embroidery for extra detail. I left them open at the bottom and stuffed them with mini bags of sweets. I thought they could be used as an egg cosy, a puppet or as a secret sweet stash (but don't tell the parents). You could always stuff them and sew them up and they would just be cute friends.

Taa-daa.

FiveGoBlogging Crochet Monsters amigurumi

FiveGoBlogging Crochet Monsters amigurumi


I am joining in with Pinaddicts where your inspiration comes from Pinterest and you have a go yourself. Pop over and check out the other craft-a-holics being inspired.

Oh and if you like the monsters and fancy one ready made I could be persuaded to make one for you. Email me, yeah. x

Sunday, 18 November 2012

How To Make A Notebook Fabric Cover

You know I like to make stuff, and I like to sew, and I love stationery, well what would be the perfect thing for me to make?

This!

Fabric covered notebook


A fabric cover for a notebook (or diary or address book).

I was inspired by this one I found at Patchwork Delights blog

patchwork delights


And it is pretty easy to make. I made my first one at a workshop held by Jo Leatherland at Heartstitch Workshops in Stamford. I have unashamedly borrowed her tutorial to share with you here.

First measure the book you are going to cover.
Measure the length of the book from top to bottom, then add 5cm for seam allowances.
Then measure around the width of the notebook. You need to start at the right hand edge of the front cover and measure all the way around the back. You can't just measure the width and double it because you also need to allow for the depth of the notebook and the spine. Take this measurement and add 5 cm for seam allowances.

You will need to cut two pieces of fabric of these dimensions. One for the outer cover and one for the lining.

Next you need to measure the flaps that secure the notebook inside its cover. This is the length of the notebook from top to bottom plus 5 cm, by the width of the notebook (literally just the width this time) plus 5 cm. You need to cut two pieces of these dimensions. I used the same fabric as the outer.

Next you can cut an optional pocket for the inside of the front flap. This needs to be half the width of the notebook plus 5cm by 20cm in length. Cut this from the lining fabric for a contrast if you wish.

Finally cut a strip of lining fabric for the spine. This needs to be the length of the notebook plus 5cm, by approximately 10cm in width. The width is dependent on the depth of the notebook, the thicker the book the wider the spine, so use your judgement to adjust this according to your notebook.

If you have used dress weight fabric you will need to add a layer of medium weight interfacing to reinforce the cover. Cut this to the size of the cover piece of fabric. I would also add interfacing to the flap pieces. If you are using heavier weight fabric you won't need interfacing.

You should have a selection of pieces that looks like this. (I forgot to add the spine piece to the photo - numpty!)

your pieces


If you fancy adding embellishment to your cover like embroidery or applique, do this now before you construct the cover. I added a little embroidery to mine. You can be as creative as you wish! But make sure that whatever embellishment you add is sited correctly on the fabric for your cover.

Now sewing.

Fold and iron a seam allowance of 1cm along each long side of the spine piece. Line this up centrally on your outer cover section and top stitch along both long edges to secure. You could use contrasting sewing thread or a fancy stitch on your sewing machine.

Top stitch the spine


Take the pocket section and fold in half with right sides together along its length so that it measures about 10cm by the width of your flap. Sew along one side of this piece and turn right side out. Then top stitch along the top folded edge.

Take each flap piece and fold and press in half lengthwise with wrong sides together. Ensure the interfacing is sandwiched in the middle if you are using it.

Pocket on your front flap


Place your pocket piece on to what will be the left hand flap lining up the bottom edge. Top stitch closely to the right hand edge to join the pocket to the flap.

Now it is time to join all the pieces together.

First lay the outer cover piece right side up on your work surface.
Next lay each flap section to meet the left and right edges of the cover piece. Ensure that the folded edge is centremost and raw edges are meeting the left and right edges of the cover. The pocket should be facing down.
Next lay the lining piece on top with the right side down.

Layer up your pieces

Pin through all the layers and stitch all the way around the cover starting and ending at the bottom but leaving a 5cm gap through which you will turn the cover inside out.

Don't forget to leave a gap

Trim the fabric back close to your stitching to reduce bulk. Cut across all the corners to within a couple of millimeters of the stitching so your corners can be turned easily.

Trim seams and corners

When you have turned the cover you will need to use a pencil or the end of a knitting needle to push the corners right through. When you have done this press your cover thoroughly and then topstitch all the way around.

Top stitch edges

It is now ready to fit onto your notebook :-)

Moment of truth

If you have a go, do come back and add a link to it in the comments. Joining the Pinaddicts


Monday, 2 July 2012

Homemade Business Cards For Pinaddicts

... or how to pimp yourself for no money if attending a blogging conference!

I am slightly in love with Moo cards. Particularly those dinky little ones.
But, when on a budget and attending a blogging conference, what takes priority? Pennies for post conference drinkipoos or pennies for business cards that are going to get lost in the plethora of free bumf*?

I made an executive decision and went for the drinkipoos option.

That decided, I was left with another dilemma: do I bother with business cards that are going to get lost in the plethora of free bumf anyway, or make some, thus losing any credibility as a serious blogger?

I went for the latter.

A surf of Pinterest and the net, shed light upon a couple of options of home made business cards which, as a blogger who sometimes likes to craft, had potential. So I pinned them on my Pinaddicts board.

homemade business cards bornagaincrafter.blogspot.com
Source: Lyssa-Beth.com

homemade business cards
Source: Madalyn_K

homemade business cards
Source: Craftingagreenworld.com


Then there was the challenge to reproduce something of an equally professional standard. Reminding myself of the less than generous budget for these cards (i.e. zero), I rummaged through my stationery stash and came up with these.

Index card


I have absolutely no idea why I would have index cards but there you go.

Next I had to design the card. I used the ever wonderful Picmonkey for this. And then sized it so that it came out the right sort of size for a business card. Trial and error, I'm afraid. After all, the cards would have to fit into my recycled jeans business card case! I found I could fit 3 cards onto one index card using standard UK business card dimensions.

Then I shoved the index cards through the printer and got the text part sorted.

My iconic Misty Moo had to be on the card so people would recognise me, so I decided to give her a multi-coloured facelift. I resized the original image so that when printed it could squeeze into the space on the card, and then copied it several times in different colours (again using Picmonkey), before arranging them to fit onto A4 paper. I did this on a Microsoft Word document. (Cue gasps of incredulity! But why didn't you use Photoshop/Gimp/Photoscape? I have no idea.)

After trimming the cards and cutting Misty Moos out, I sewed them together.

I made about 30 and gave out half of them, mostly to friends! I did hand them to a couple of sponsors at BritMums Live who will certainly remember them in their piles of cards. And isn't that what you want? People to remember you?

Five Go Blogging Homemade Business Card

Machine Sewn Homemade Business Card

Homemade recycled business card holder

Homemade business cards in a homemade business cards holder

I'd love to know what you think of them. Uber cute? Or Uber trashy?
I'm joining in with the Pinaddicts over at My Love Bumps.

MyLoveBumps

*Definition of Bumf: Printed matter, such as pamphlets, forms, or memorandums, especially of an official nature and deemed of little interest or importance.

Tuesday, 5 June 2012

More Shabby Than Chic Bunting

I love the Pinaddicts challenge. It mashes up my love of crafting, with my secret addiction to pinterest, and blogging. What more could this girl want?

So this month, still clinging onto the sewing machine, and with the Jubilee in mind, I had a bash at bunting. Not the trickiest of projects I grant you but that was intentional. I seem to have a shortage of me-time at the moment so this needed to be crammed into an evening.

Here is my inspiration available from Pottymoos.com.

shabby chic union jack pendant


I had an old shirt from the Mr, a patchwork top I picked up for £1, some gingham ribbon for £2 and plain white tape for 60p from the market and I found a template from TheBigLunch.com. What I didn't have was any instructions. Could I be bothered to look? Nope. So I kind of bodged it like so.

More shabby than chic Bunting

Borrow a pair of pinking shears (Ouch! Pricey! So now on my Christmas list) and cut out 8 triangles of the patchwork fabric, and 8 of the shirt fabric for the backing. I figured the pinked edges would only add character to the bunting (and I could not be bothered to sew them and then turn them).

Then I measured and cut the gingham ribbon to form a Union Jack inspired cross.
I took the front piece of the bunting and zigzagged the ribbon down the length of the pendant pinking the ends.
Then I zigzagged the ribbon across, left to right.
Then top left to bottom right and finally top right to bottom left to make up the full cross.

Then I pinned the wrong sides of the front and back pieces of the pendant together and zigzagged all around.

It was at this point I realised I should have just cut the pendant pieces using straight scissors and only pinked the edges after each pendant was sewn toegther. That way I wouldn't have bits of ribbon hanging over the edges and have to try to cut them in a zigzag shape with regular scissors having given the pinking shears back and it being 10 o'clock at night. Doh.

Finally I positioned the pendants along the length  of tape ensuring that the gap between each one was the same and zigzagged each pendant onto the tape.

And there you have it. My more-shabby-than-chic Bunting.


Now for more craftiness inspired by pinterest, go to Simply Outnumbered who is hosting this months Pinaddicts extravaganza.


LifeAsIKnowIt


Tuesday, 8 May 2012

Recycled Business Card Case

A couple of weeks ago I had a very fanciful idea of making 25 things out of an old pair of jeans or two. I then whittled  it down to a shortlist of about 6. I then forgot all about it, distracted by life and family until last week when I remembered it was Pinaddicts time and I really wanted to get crafty.

So out of the short-shortlist I found this.


And this.


I find it really easy to be inspired to make something. And even easier to run out of motivation/energy so this was a bit of a rush job at the last minute (last night in fact). Subsequently I have failed to take any photos of the work in progress (candle light is so hard for photographers you know) but instead I found this handy little tutorial which give full instruction on the main construction elements.

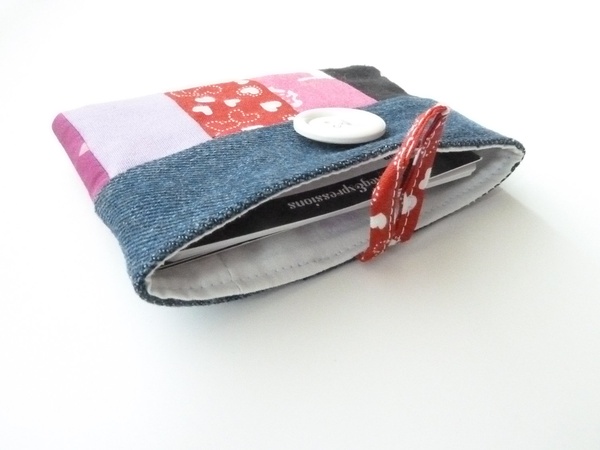
And here you are - the resulting recycled jeans business card case:

Recycled jeans business card case


The decoration started out as post it pad illustrations that I then interpreted for the sewing machine. I had an hour people so don't be too critical!!


However it gave me a little inspired lightbulb moment!

Who fancies a business card case for Britmums? I would have said Cybher but time is somewhat limited now!
I can knock one up for you from one of 3 designs for the not too princely sum of £6 + £1.50 p&p.

Design choices:

recycled jeans business card case


If you are interested, email me with your preferred design choice (cassette, camera or @), your name and address would be handy, and I'll send you paypal details for payment. I reckon (depending on demand *ahem*) I can get one to you in 5 working days.

The outer fabric will be denim but the inside lining material may vary depending on demand!

How cheeky am I?

And here are some other crafters that have been a bit busy interpreting their Pinterest finds for #Pinaddicts.


LifeAsIKnowIt

Thursday, 8 March 2012

From Sweater To Infinity Scarf

I cried. No, actually I sobbed.
My beloved wool tunic sweater accidentally slipped into the washing machine when I wasn't looking and fell out somewhat smaller than when it had gone in.
I got it in the January sales. It is was new!

After I had pulled myself together, researched 'unfelting my shrunken sweater' on google and come up with "Oh dear", I took heart in a couple of pins I had popped onto my #pinaddicts board thinking that they would make a good project one day.

Source: flickr.com via Alison on Pinterest


Suddenly I find myself with the raw material, i.e. my shrunken sweater.

I laid it out flat and attacked it with scissors to get 4 rectangles, two from the front and two from the back.


I am just going to pause for a second here to remark on how shrunken wool does not unravel or fray. Amazing! Apparently if you boil the stuff and then tumble dry it for good measure it can become very stiff and you can make allsorts from it. I wanted my shrunken sweater to remain soft, which it has, albeit a smaller soft than it was in its original form.


Taking 2 pieces, I oversewed the short edges together in a contrasting cotton, basically butted the edges together and zigzagged on the machine.


The wool tends to stretch a bit at the edges but that wouldn't particularly matter for the finished article I had in mind.

I joined all 4 pieces together along their short edges in a contiuous loop.

Taking inspiration from the felt pouch I'd pinned I started to free machine embroider a few wavy lines here and there.


Tada! One infinity scarf which I can wrap it two or three times around my neck.


At least my washing accident had a happy ending.

If you have any shrunken sweaters I really recommend this project. Really easy. Or go buy a wool sweater from a charity shop and put it on a hot wash!

The idea to pin and make came from a group of crafty ladies who collectively are known as #Pinaddicts
Pop over to Melsham Mum who is hosting the party this month for some other fabulous makes.


LifeAsIKnowIt