So Picnik has edited it's last photo. Orton-ished its last pic, HDRed its last snap and I am...
... so over it! Hah!
Because I have Picmonkey instead.
Except...
...they haven't launched collages yet, which is a little favourite of mine so I have had to resort to other sites for my cut and paste fix.
I asked what software the good folks of Love All Blogs used for collages and realised that there wasn't a simple answer that had the features and effects of Picnik AND collages. PicMonkey are promising collages soon but in the meantime I have had a scout around and found Photoscape to be my favourite.
Photoscape can do simple collages and it is very easy to use. You do have to download the software which is FREE but it is then limited to the device you have it loaded to. Photoscape has loads of other great stuff too like editing effects, text, a few decorative bits and bobs, animations and screen grabs which is handy if you are going to do a quick tutorial like this:
Ta-da - Photoscape
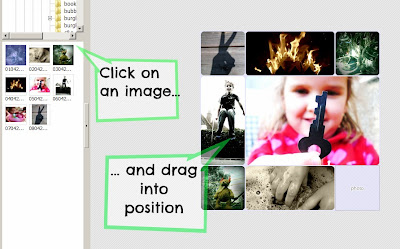
First step is to locate your photos using the navigator on the left hand side of the screen
Then choose your collage layout from the large selection on the right hand side of the screen. Think about how many images you want to include, baring in mind the more your have the less detail you will see in the finished collage on your website. If you have spare space you can always use it to add text and title your collection.
You need to adjust the size of the finished collage by clicking on the little acorn. What is the best size for your website layout? You can also change the aspect so make it portrait or landscape.
Now the fun part of arranging your photos. Think about colours and themes of the pictures so that the finished collage is balanced. For example if you have a selection of colour and black and white shots, you may want to keep them mixed up so that all the colour isn't over on one side.
You can adjust the position of the images, because the size of the photo may not exactly fit into the space you have allocated it. You can also move photos around or delete them until you are happy with the arrangement.
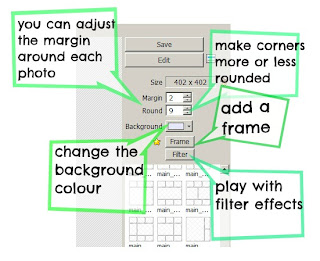
Final tweaks now. Increase or decrease the margin between images, adjust the roundness of the corners, change the background colour, add frames to the images or add a filter effect to each one. These adjustments really add the finishing touches to the collage.
Last but not least, SAVE! This saves the collage as a new image onto your computer.
Have fun with your collages until PicMonkey launch their own!
What collage software are you using? Care to share?


Just what I needed for next week. Ta very much!
ReplyDeleteYou're welcome :)
DeleteOoh thank you for that - I hadn't found any good collage software and love the tutorial too. Lots of last Picnik posts today!
ReplyDeleteMy fave is definitely Photoscape for collages. Shame it doesn't do all the PicMonkey stuff as well!
ReplyDeleteI use Piccassa for colaages, going to give this a try
ReplyDeleteReally uesful. Thank you!
ReplyDeleteI used Photovisi - but only the once and it didn't have anything like as many extra options as this one! But then it is free... Is Photoscape free or do you have to pay?
ReplyDeleteYep, totally free.
DeleteWould have been really handy to include a link to it wouldn't it - duh!
http://www.photoscape.org/ps/main/download.php
This looks good. Super tutorial. Will give it a try.
ReplyDeleteI've just used it on my 52 Photo Project this week thank you x
ReplyDelete