Wednesday, 28 November 2012

Eyes

If you follow me on instagram or have ever had an idle glance at my instagram box over there on the right, you will know I have a new hobby.

And it seems that I am not alone in my hobby having spotted an article on the Daily Mail website on Monday, remarking on a phenomenon discovered in Mrs Warriner's back garden recently involving Meercat triplets.

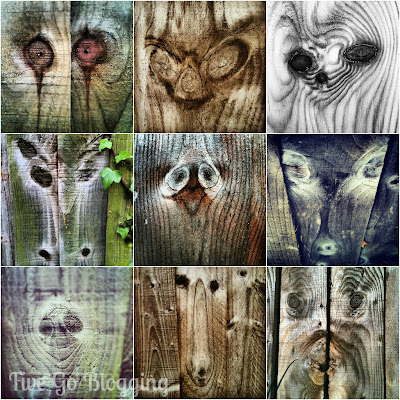
As I walk to and from school, as I endeavour to round up the abundant leaves in our garden, as I walk the dog through the streets, you will find me, pausing occasionally, squinting possibly, and whipping out my iphone to capture my latest obsession: fence faces.

They are everywhere. Just stop for a moment or two and stare at a fence and I defy you not to spot at least one pair of eyes peeking back at you.

But why stop there? I have finely tuned my skill of spotting faces to spotting expressions and even animals. For example, cow, horse, emu, Chihuahua, Pekingese, gremlin, ghost, moose and mascara running sad face. I have spared you the long-tailed tit in profile sitting on a branch and the owl chick but please take a look in my instagram gallery.

For for delight and wonder I give you Fence Faces:

#fencefaces

So next time you pass a fence, have a look. Ignore passers by staring at you staring at the fence and capture your first fence face. Post it on instagram and tag me or use #fencefaces so I can marvel at your new found friend too.

Joining in with The Gallery and the theme of Eyes at Sticky Fingers.


Sunday, 25 November 2012

365project week 47 - Light

The light may fade too quickly at this time of year but I love that the sun is hanging so low in the sky and all you can see are silhouettes. I love the atmosphere, the stark contrasts it provides, the way it sometimes seems to be shining directly at me, pointing me out as if to say, 'That's her. That's the one who needs make a decision and get on with it instead of procrastinating.'

It is encouraging me to step out with my camera, to get on with those many things on my to do list that need doing while the kids are in school before I get distracted.

I managed a morning of printing with some friends this week which got me thinking about using my creativity in a more productive way and I made countless (14) Christmas Trees and Angels and stars too. So it hasn't been a fruitless week but the spotlight is still shining at me, daring me to do something.


The sun was too quick so my chandelier provided my shining bright moment.
A perfect Autumn walk in the last sun.
Late walk home as the street lights start to glow orange.
Sunlight through a window shining promise into his eyes.
Highlighting the brilliant green moss against a damp dreary leaf strewn path.
My design. My effort. My printing.
My star wasn't shining so brightly but some glitter soon fixed that ;-)


I'm joining in with my fellow 365'ers who never let life get in the way of a good photo over at The Boy and Me.


My photos are in my album on the 365project site. I'd be so happy if you went to take a look.

TheBoyandMe's 366 Linky


Friday, 23 November 2012

How To Make Angels and Christmas Trees From A Paperback Book

It is a sad fact that even charity shops have to pulp books after their pages have curled on the shelves too long. Incredibly not everyone wanted to read Mills and Boon 'Christmas Nights' by Sally Wentworth. If I was Sally I would be gutted.

From pulp fiction to Christmas tree in 3 easy folds.

But I have found a craft so simple, so easy, even those missing the craft gene can do it. And in the process we save unloved books from a fate worse than landfill.

Turn unwanted and unloved paperbacks into Christmas Trees and Angels.

I should warn you though, there is one problem making these, especially for a book worm. The temptation to try to read as you fold the pages is IMMENSE and you may find yourself drawn into a fictional world unwittingly. If you resist, these decorations can take less than half and hour to make. If you are sucked in, more like 72 hours.

Here are examples of what you can do with that unwanted fiction...

Simple Christmas Tree made from The Yellow Pages:

One Christmas tree (formerly the Yellow Pages)

Embellished with a little gold spray and a Star:

Paperback Christmas Tree


Blinged baby!

Blinged Paperback Christmas Tree


Here's how.

You want a paperback that is about 120-150 pages long (that is numbered pages, not leaves of the book). If you have one longer, just tear it in half. I know that this goes against all things literary but take a deep breath and rip. Now rip off the cover and bend that spine back. If anyone is hyperventilating at the thought of mutilating a book, have a paper bag on stand by.

For a simple Christmas tree.

Fold each page so that the top right hand corner folds down into the middle of the book.

Paperback Christmas Tree - Fold 1

Then fold the page again so that it meets the middle of the book.

Paperback Christmas Tree - Fold 2

Turn this folded page over and fold up the triangle that is sticking out at the bottom.

Paperback Christmas Tree - Fold 3

Tuck this in.

Paperback Christmas Tree - and tuck


Carry on doing this for every page.

makes a pretty pattern

It will get a bit difficult towards the end as the folded pages increase the volume of paper at the spine but try to get each fold into the center of the book. When all the pages are folded it will stand up on its own in a tree shape.

To embellish it, paint with a little glue and add a dash of glitter.
Or lightly spray paint it.
Add a bauble star.
Make an origami star.
Add tinsel. Okay maybe that is a step to far.

To make an Angel:

Fold the first 20 leaves of the book as if you are making a Christmas tree. Then fold the next 5 or 6 leaves upwards, varying the amount of the second fold for each page to create a fan effect.

Paperback Angel Wings - Fold 1

Paperback Angel Wings - Fold 2

Paperback Angel Wings - Fanning


This is one of the angel's wings. Continue folding pages as you did for the tree until you are about 25 leaves from the end. Then repeat the upwards fold for 5 pages reversing the order of the fanning effect in order for your angel's wings to be symmetrical. Fold the remaining pages as you did for the tree.

To complete the angel glue a bauble on the top for a head or a polystyrene ball or ping pong ball. You can spray paint it or glue and glitter it to create your desired effect.

turn a book into an angel


You don't have to use a book if you find you cannot bring yourself to do it. You could use a quality magazine (as long as it has a glued spine) or a catalogue.

These are seriously easy and hopefully I have inspired the bloggers who are making decorations in aid of The Society of St James, a charity for the Homeless. If you want to know how you can get involved to add a little Christmas cheer for the homeless of Southampton, then visit Mammasaurus blog to find out more.

Tots100 Experience Days Competition

Wednesday, 21 November 2012

Wish upon an Origami Star

Call me a cheapskate but if you can make a cute origami star in 5 minutes from a sheet of newspaper or wrapping paper or a magazine why wouldn't you?

Newspaper print Five Point origami star


These origami five point stars are really simple and after a couple of practice ones *cough* I can knock them out in minutes. I made a garland of them but I'm going to stick 2 or 3 together and make a couple of decorations for the tree too.

First cut yourself a pentagon template that is about 10cm in height to make a 5cm star. If you want bigger stars go for a bigger template but make sure it fits the paper you are using! You can buy templates from a craft shop but being a cheapskate I found an image online and traced it straight off my PC screen.


How to make a five point origami star 
 
  1. Cut a pentagon from the paper you want to use. Fold it in half across each of its 5 axis. You don't need to draw the lines but I have so it was easier for you to see.
  2. Fold a straight edge of the pentagon upwards past the centre so that the corners meet the folds (lines) coming from the left and right points. Do the same fold for each straight edge. You will have created a small pentagon based 'basket' shape.
  3. Pinch the five points together.
  4. When all five points are pinched in, bring them into the center.
  5. Start to flatten the corners of the small pentagon you have created, folding down towards the left.
  6. Continue to work around the pentagon folding each point flatter as you go.
  7. You will eventually completely flatten each point down.
  8. You will create a mini pentagon in the center.
  9. Turn the star over where there is another larger pentagon.
  10. Fold up the corner of this pentagon towards the center creating a narrower point to the star.
  11. Fold each point of the hexagon up working around in a circular way such that the last fold tucks underneath the first and holds itself in place. This forms the finished star.
  12. It also looks good on the reverse!
Five Point Origami Star Garland

Five Point Origami Star Garland


Have fun making them and feel free to add links to your own origami stars in the comments x


Sunday, 18 November 2012

How To Make A Notebook Fabric Cover

You know I like to make stuff, and I like to sew, and I love stationery, well what would be the perfect thing for me to make?

This!

Fabric covered notebook


A fabric cover for a notebook (or diary or address book).

I was inspired by this one I found at Patchwork Delights blog

patchwork delights


And it is pretty easy to make. I made my first one at a workshop held by Jo Leatherland at Heartstitch Workshops in Stamford. I have unashamedly borrowed her tutorial to share with you here.

First measure the book you are going to cover.
Measure the length of the book from top to bottom, then add 5cm for seam allowances.
Then measure around the width of the notebook. You need to start at the right hand edge of the front cover and measure all the way around the back. You can't just measure the width and double it because you also need to allow for the depth of the notebook and the spine. Take this measurement and add 5 cm for seam allowances.

You will need to cut two pieces of fabric of these dimensions. One for the outer cover and one for the lining.

Next you need to measure the flaps that secure the notebook inside its cover. This is the length of the notebook from top to bottom plus 5 cm, by the width of the notebook (literally just the width this time) plus 5 cm. You need to cut two pieces of these dimensions. I used the same fabric as the outer.

Next you can cut an optional pocket for the inside of the front flap. This needs to be half the width of the notebook plus 5cm by 20cm in length. Cut this from the lining fabric for a contrast if you wish.

Finally cut a strip of lining fabric for the spine. This needs to be the length of the notebook plus 5cm, by approximately 10cm in width. The width is dependent on the depth of the notebook, the thicker the book the wider the spine, so use your judgement to adjust this according to your notebook.

If you have used dress weight fabric you will need to add a layer of medium weight interfacing to reinforce the cover. Cut this to the size of the cover piece of fabric. I would also add interfacing to the flap pieces. If you are using heavier weight fabric you won't need interfacing.

You should have a selection of pieces that looks like this. (I forgot to add the spine piece to the photo - numpty!)

your pieces


If you fancy adding embellishment to your cover like embroidery or applique, do this now before you construct the cover. I added a little embroidery to mine. You can be as creative as you wish! But make sure that whatever embellishment you add is sited correctly on the fabric for your cover.

Now sewing.

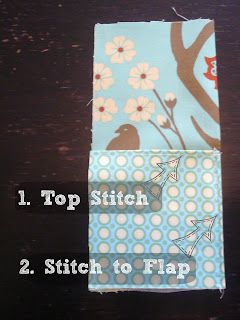
Fold and iron a seam allowance of 1cm along each long side of the spine piece. Line this up centrally on your outer cover section and top stitch along both long edges to secure. You could use contrasting sewing thread or a fancy stitch on your sewing machine.

Top stitch the spine


Take the pocket section and fold in half with right sides together along its length so that it measures about 10cm by the width of your flap. Sew along one side of this piece and turn right side out. Then top stitch along the top folded edge.

Take each flap piece and fold and press in half lengthwise with wrong sides together. Ensure the interfacing is sandwiched in the middle if you are using it.

Pocket on your front flap


Place your pocket piece on to what will be the left hand flap lining up the bottom edge. Top stitch closely to the right hand edge to join the pocket to the flap.

Now it is time to join all the pieces together.

First lay the outer cover piece right side up on your work surface.
Next lay each flap section to meet the left and right edges of the cover piece. Ensure that the folded edge is centremost and raw edges are meeting the left and right edges of the cover. The pocket should be facing down.
Next lay the lining piece on top with the right side down.

Layer up your pieces

Pin through all the layers and stitch all the way around the cover starting and ending at the bottom but leaving a 5cm gap through which you will turn the cover inside out.

Don't forget to leave a gap

Trim the fabric back close to your stitching to reduce bulk. Cut across all the corners to within a couple of millimeters of the stitching so your corners can be turned easily.

Trim seams and corners

When you have turned the cover you will need to use a pencil or the end of a knitting needle to push the corners right through. When you have done this press your cover thoroughly and then topstitch all the way around.

Top stitch edges

It is now ready to fit onto your notebook :-)

Moment of truth

If you have a go, do come back and add a link to it in the comments. Joining the Pinaddicts


365Project Week 46

It's the nature of things.
Life, laughter, love and loss.

Five Go Blogging 365project week 46

We said goodbye to a good friend and neighbour to the sound of a guitar strumming and peals of laughter through the tears.
The last few leaves that were clinging to the tree have finally fallen.
The spider departed but left beauty in its wake.
The young are told the stories so that memories live on.
Life has many textures, hard, rough, smooth and fragile.
A true friend is as comfortable as a pair of slippers.
Life has it's ups and downs but one thing is guaranteed, it doesn't pause for a second (except through a lens).

May your week be more ups than downs and more smooth than rough x


I'm joining in with my fellow 365'ers who never let life get in the way of a good photo over at The Boy and Me.


My photos are in my album on the 365project site. I'd be so happy if you went to take a look.

TheBoyandMe's 366 Linky

Silent Sunday

guitar wreath for Nick Askew


Saturday, 17 November 2012

Saturday is Caption Day

It's exhausting being a toddler. Actually, he is older than a toddler but younger than a pre-schooler. So what does that make him? Apart from a right royal nuisance (she says lovingly and not really complaining at all, much)?


If you like it better put a caption on it!


And then pop yourself along to Mammasaurus who does a fine line in captions.


Tuesday, 13 November 2012

Cheap as Chips Christmas

On a budget?
Feeling the pinch?
Or just plain old skint?

I am on the hunt for thrifty Christmas gifts, decorations and Christmas crafts having just spotted this present idea on City Girl at Heart. Her idea of framed Puffin Postcards is really lovely and I love that you can really match the Puffin postcard to the recipient showing how much thought went into your £1.53 gift!

I made this fabric cover for a notebook the other day for a friends birthday present and I am going to make a few more for more Christmas gifts. Tutorial here.

fabric covered notebook


I may change the notebook for a diary or address book to mix things up a bit. Rebel aren't I?

And last Christmas I got creative with some magazines and catalogues and made Christmas trees with them.

magazine christmas trees catalogue christmas trees


I have also made stars and angels.


But I am on the hunt for more thrifty Christmas gift ideas, new or charity shop finds, recycled or re-purposed, homemade or bought. Have you been scouring the Internet for bargains, or traipsing through charity shops for vintage finds? Are you a crafter and busy making gifts? Have you set up a sweat shop to get the kids making decorations for Christmas?

Come and share your "Cheap as Chips Christmas" finds!

Please link up to this one time only Cheap as Chips Christmas bloghop and lets get Christmas in on budget!
Don't forget to add this badge to your post, old or new :-)

I can't wait to see your ideas *excited face*


FiveGoBlogging


Sunday, 11 November 2012

Silent Sunday

rememberence sunday scouts


365project Week 45


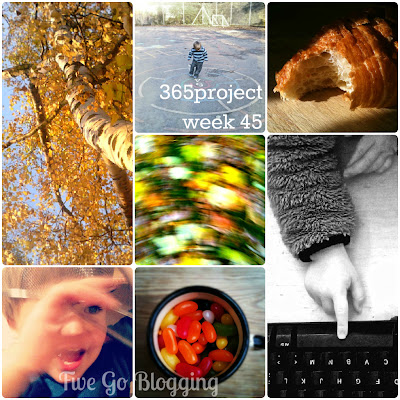
Falling
Leaning
Crumbling

Spinning

Tapping
SHOUTING
Munching

and again not nearly enough snapping.

Five Go Blogging 365project week 45

I will seek inspiration from my fellow 365'ers who never let life get in the way of a good photo over at The Boy and Me.


My photos are in my album on the 365project site. I'd be so happy if you went to take a look.

TheBoyandMe's 366 Linky